quarto render4 Self-publish
Publishing content online is very easy today. One can use WordPress and similar platforms to create a website, blogs and so on.
Why, then, use r to publish content online?
Through R we can create websites and online books that we can store on online repositories like GitHub and maintain a high degree of control over the structure, contents, and visibility of the website/ book. Moreover, self-publishing using r is one way to integrate varying work-routines towards a greater goal – that of communicating own research, consultancy job involving data science, to name just a few examples.
If you work with data that comes from your data collection efforts or you use secondary data (publically available data), then self-publishing content online through r can facilitate the integration of data analysis and content creation steps.
For this section, we will use quarto to create both websites and books. Using quarto is a step forward from other approaches (quarto is a new generation RMarkdown document), including the way the present book was rendered - using the old generation RMarkdown files.
Prepping Quarto
Quarto is a new generation RMarkdown. It retains all the functions of the RMarkdown files from before while it enhances and simplifies several other work flows. Basically, Quarto makes it much much much easier for everyone to create presentations, live documents, websites, books and so on.
One can even integrate shiny functionality into Quarto documents. For the present seminar, however, we will introduce shiny apps as separate tools (see Chapter 5).
See the official quarto website here.
To create content using quarto we need:
1 - r, which we download and install as described in Chapter 2.
2 - RStudio, which we download and install as described in Chapter 2.
3 - Quarto, which can be downloaded here and installed following the indicated steps. Make sure you choose the installation package that suits your operating system.
After you’ve successfully installed r, RStudio, and quarto on your computer, we can start with creating websites and books.
Website
In Chapter 3, we’ve seen that working in Rproj simplifies the work flow including, for example, presetting path dependencies relative to the project folder.
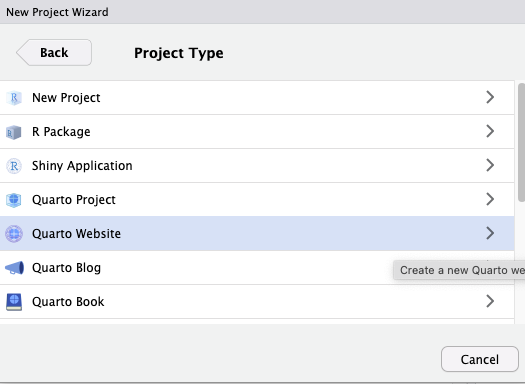
We will use the logic of projects here (and for books) as well. Open RStudio and create a new project Quarto website. See Figure 4.1.
When you create the project, there will be several files created by default: .qmd, .yml, .css as well as a folder “_site”. The files and folder already contain the fundamental structure of a working website.
To open this default website on your local computer, navigate inside the folder “_site” and open on your Internet browser the .html1 file index.html.
Every website (and online book) has such an index.html file. This file indexes the other files composing the website (or book).
4.0.1 .qmd
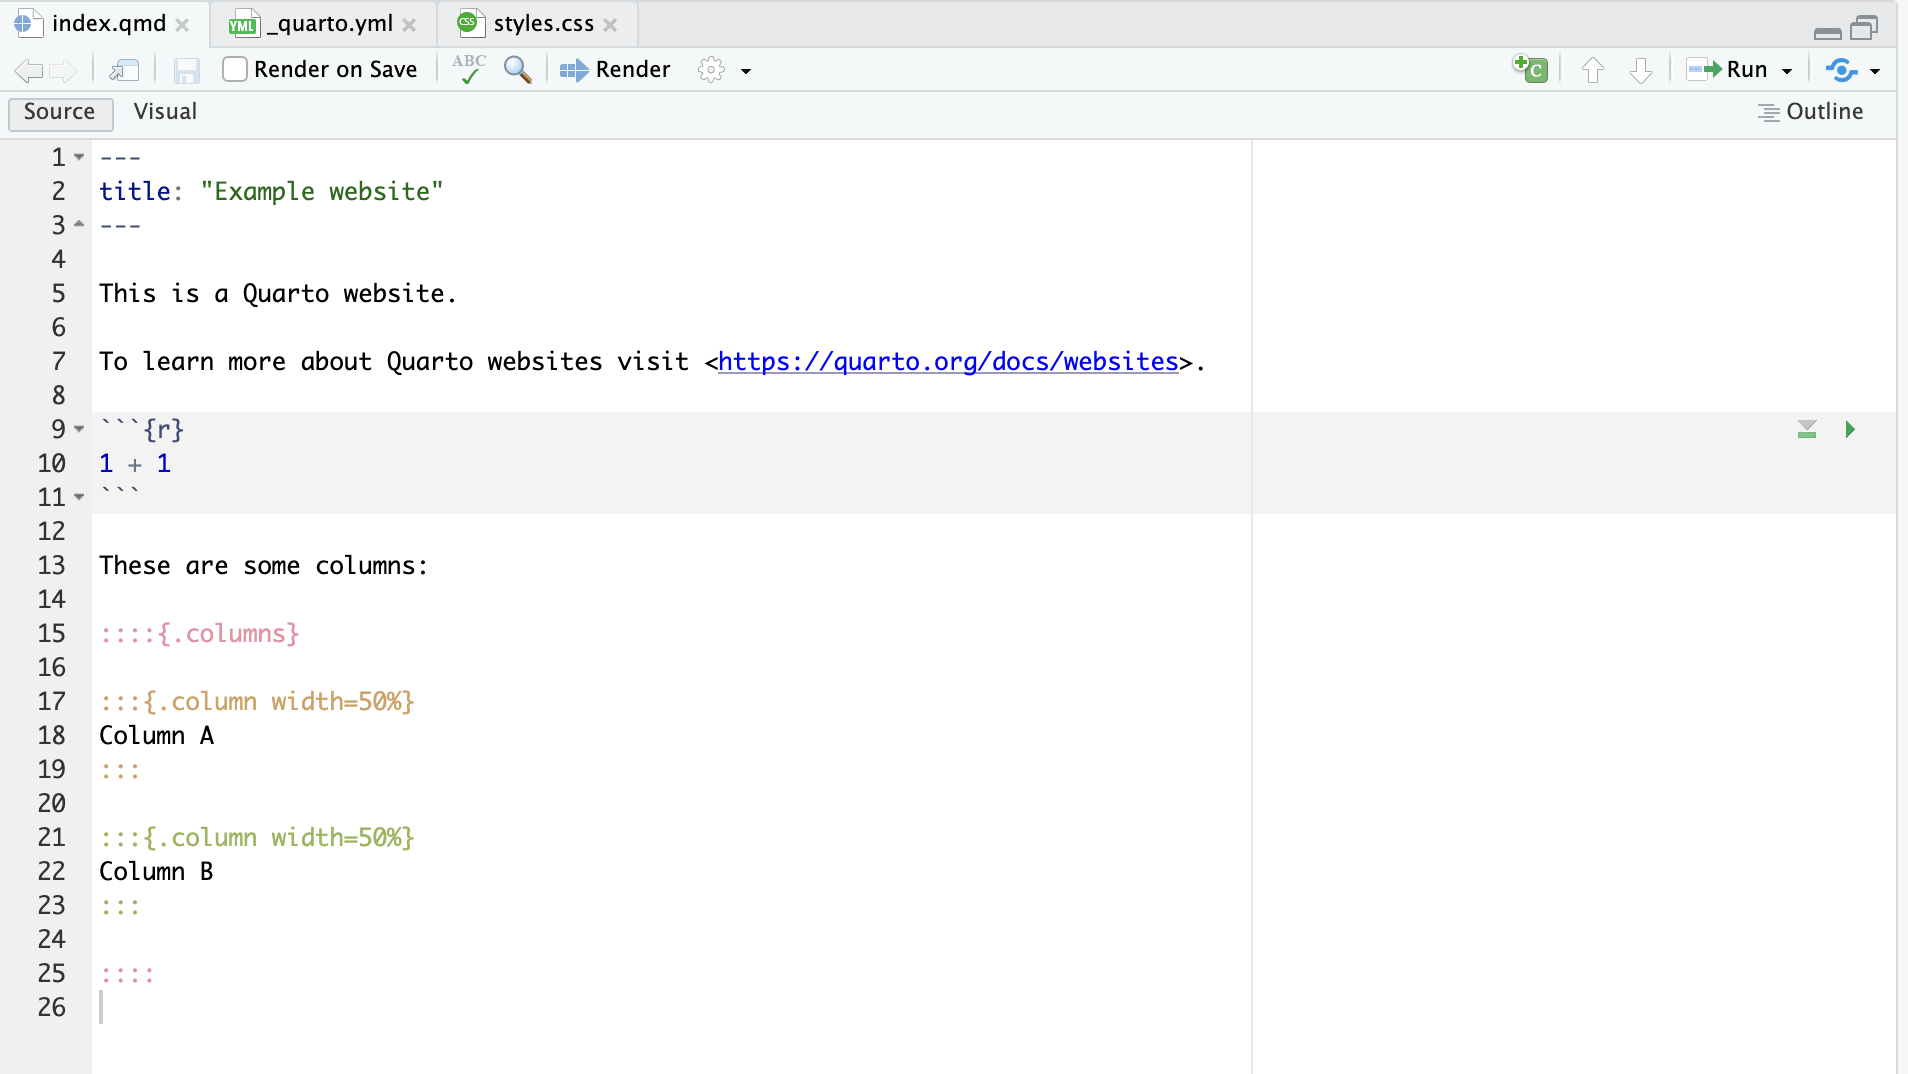
We can see the by now familiar structure including the yaml header at lines 1-3, the r code chunk at lines 9-11 and the static text.
.qmd is the new generation .Rmd
We can also see the Render button on the upper bar where the knit button would be in an old generation RMarkdown file.
We can edit this file in virtually identical manner to any other .Rmd file. I say virtually identically because the .qmd file comes with extra benefits making it easier to control the formatting of content on the page. One can easily implement some .html features such as div using the :::{} blocks2. Read more on the basics of .qmd here.
See for example how a two columned format looks like in Figure 4.3. Include it in your .qmd file and then render it. See how it looks.
4.0.2 .yml
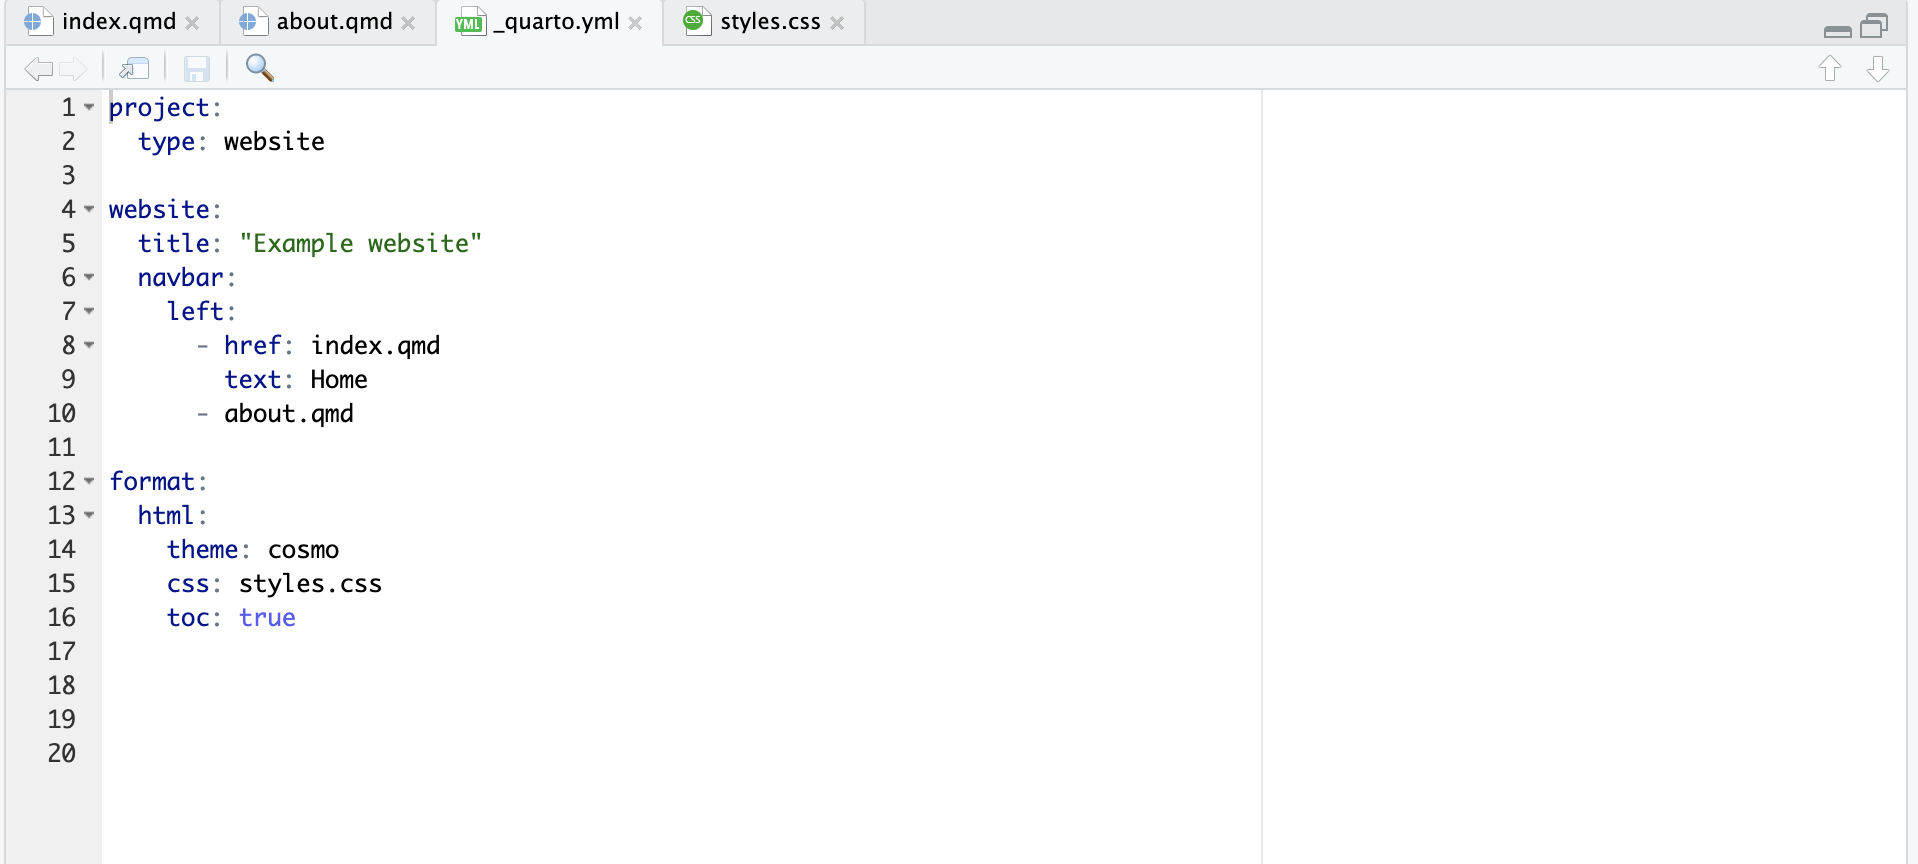
Three elements are observable when opening the default .yml file: project, website, and format. See Figure 4.4.
First, the element project defines the type of the project you work one. It can be a website as well as a book.
Second, the element website defines attributes of the website. In Figure 4.4 we can see attributes “title” and “navbar”. title allows us to give a title to the website. navbar is short for navigation bar. Let us look a bit closer at it.
Inside navbar there is an element left which defines the positioning of the navigation bar. It can also be right, for example. On the navbar we then place the individual pages - which are none other the html renditions of the .qmd files. We see two ways to place these individual pages.
One is where we give a custom label to the page: see lines 8 and 9. Another where we use the default label that derives from the title of the individual page (remember that each RMarkdown file has a yaml header and so has every .qmd file).
Third, the element format allows us to format the website overall including, for example, a theme, css (cascading style sheets) or even add a table of contents (toc). theme, css and toc and attributes of the html document. Remember from Chapter 3 the concept of parameters? Well, that is pretty much the logic here as well - these three are parameters of the html file that we can modify according to our needs. This means that there are multiple themes we can choose from and we can write our very own .css style. We may decide to include a toc or not.
Select from this list of quarto html themes the one you’d prefer
4.0.3 .css
The default .css file is empty. I would say that css is rather advanced so I won’t cover it here. Typically, one can create custom css styles for their website or can download templates from the Internet. Be aware however what you download and from where.
For the purpose of this seminar the default .css is more than enough.
4.0.4 _site folder
This folder is created by default. It is the containing folder of the rendered html files and other elements required for the final website.
For the purpose of this seminar, this folder is important for us because it contains the index.html file. By opening it on our browser, we can inspect locally the rendered website.
4.0.5 Deployment
Once you’ve created and locally inspected your website, the next step is to deploy it (publish) it online. Remember from Chapter 1 that we would need an online repository like GitHub and, most importantly, to have an open and encrypted channel connecting the local machine and the server.
One other way to publish your site is through quartopub.com. Open an account on quartopub.com. We will deploy the website using these two ways: GitHub and quartopub.com. I will describe a bit why you might want to choose one or the other.
4.0.5.1 Via quartopub
This is a very simple way to deploy your website online. It is integrated seamlessly with quarto so you only need two lines of code in the Terminal. Really.
First, we need to render the website. To link together all the files that we’ve created/ edited included the .qmd, .yml and .css.
Copy the line below into the Terminal of your website project and run it.
Next, we can publish it via quartopub provided that we have opened an account.
Copy the line below into the Terminal of your website project and run it.
quarto publish quarto-pubYou will notice some code running and finally that in the project folder there is a new yml file created _publish.yml. If you open it, you will notice among other the URL to your newly and publicly available website.
With this approach you deploy the website on a remote server and your files remain available for editing only locally on your machine. You also need to make sure that you render the website after each modification to files making up the website.
The created example is published through quarto pub here.
4.0.5.2 Via GitHub Pages
In some situations you might want to deploy the website and upload the files comprising the website on a remote repository. This means that your files can be made publicly available for other to clone them or they are available to you in the “cloud”. The website itself is deployed and everybody can access it but in addition everyone can have access to the files that create the website.
This approach might be preferable when you maintain a website as a group. Or when you create a fancy website together with colleagues from across the globe.
I wrote a step-by-step guide explanation for older generation RMarkdown. This can be accessed here.
Returning to Quarto Website and assuming that a GitHub account has been created, you may follow the steps here. A summary of the steps are provided below:
1 - Create a Quarto Website project on your local machine.
2 - Make the folder containing the quarto website a git repository3.
git init3 - Create an empty repository on your GitHub account. Then, connect the local repository to the newly created online repository.
remote add origin git@github.com:{your github user}/{your repository where the website will be hosted}.git4 - We will deploy the website by rendering it to a sub-folder docs. To do this we need to modify the _quarto.yml document. Open the .yml file, copy the following line and paste it as a sub-element to “project”. This new line should be intended and be aligned with the “type: website” element! Save and close the .yml file.
output-dir: docs5 - Create a .nojekyll file to the repository. Explanation is given here. Go to the Terminal of the website project and run the code line:
Mac/ Linux
touch .nojekyllWindows
copy NUL .nojekyll6 - Render the website. Note that the website will be automatically rendered in the sub-folder docs.
quarto render7 - We push everything to our GitHub repository.
git add .
git commit -m "Push website"
git push
8 - Check that the push was successful.
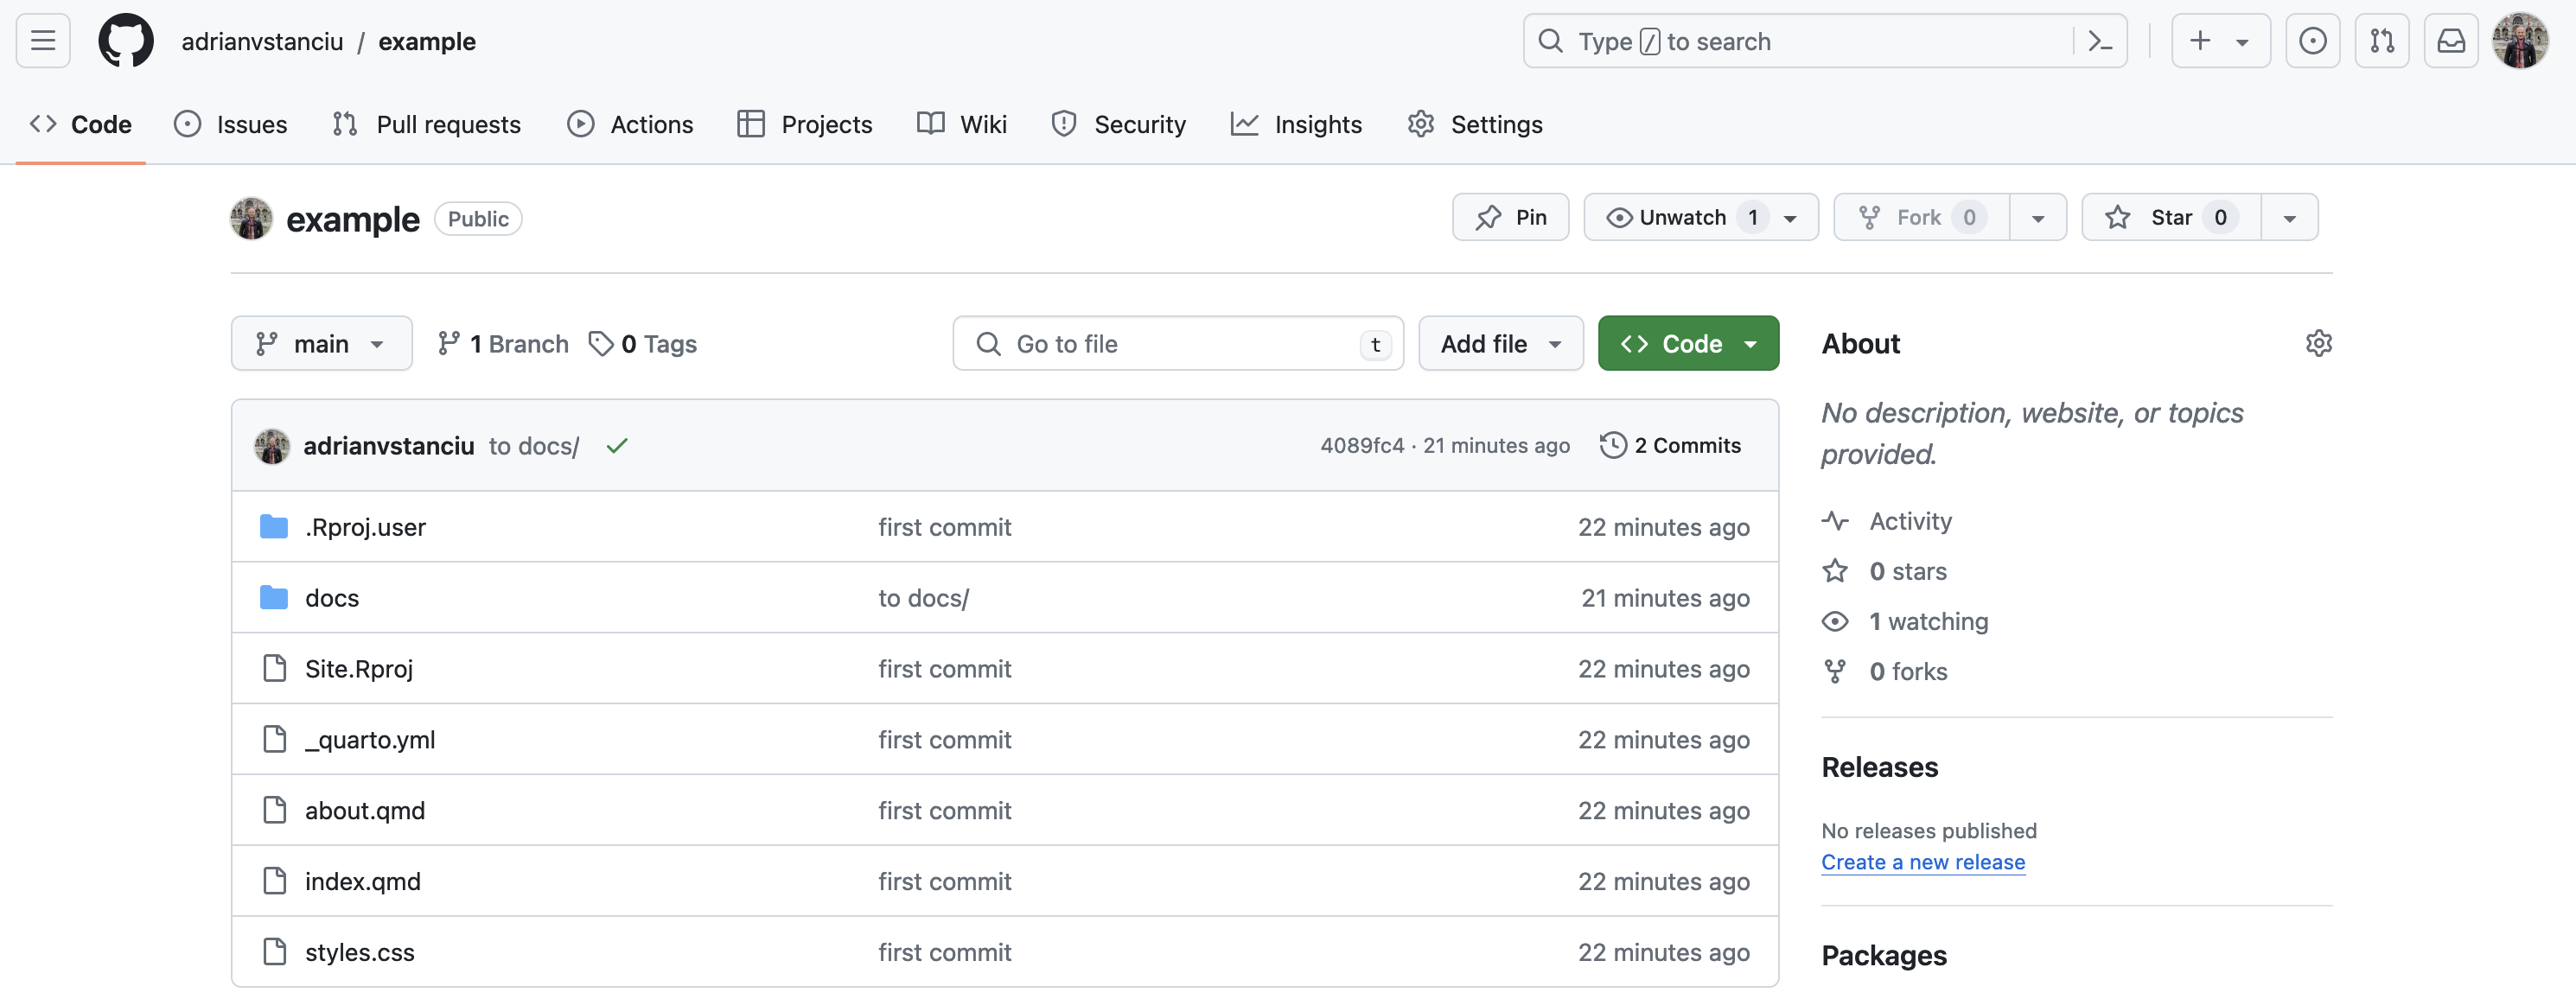
Go on your GitHub account, open the repository and it should look something like Figure 4.5.
9 - Setup GitHub to “read” the website from the sub-folder docs.
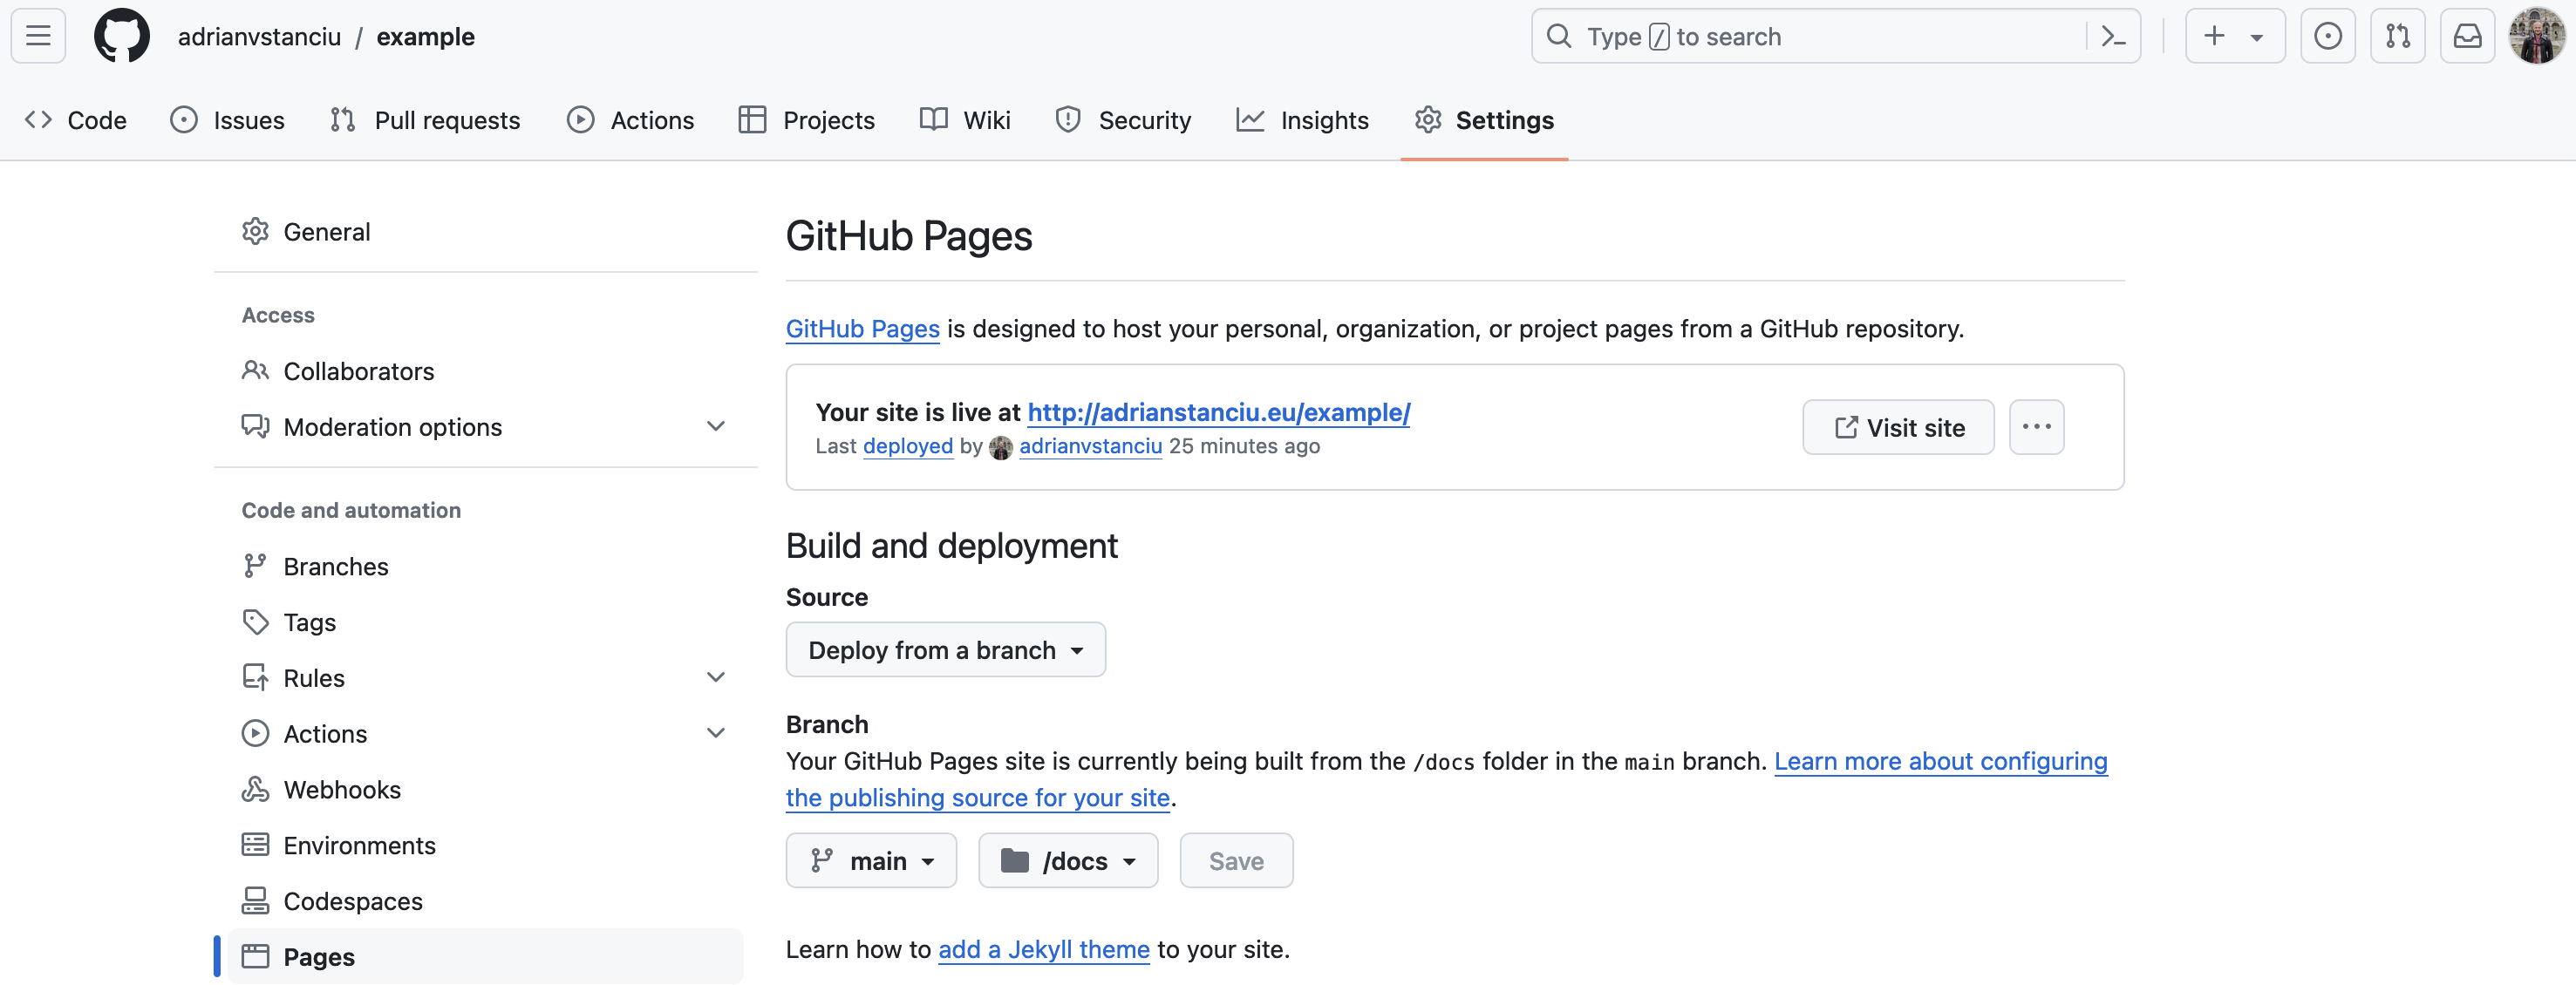
Navigate to Settings/ Pages and change under “Build and deployment” the branch and folder according to Figure 4.6. Save changes.
10 - A visit site panel will appear shortly, after the website has been rendered and created, like in Figure 4.6. This may take between a few seconds and a couple of minutes depending on the server availability. Refresh the page and the website is now publicly accessible.
11 - Now you can repeat steps 6 through 8 every time you edited or modified contents for your website. The website itself will be updated automatically (might take a couple of minutes though).
The created example is published via GitHub pages here4.
You can publish your website (or book, as we will see in the next section) on a custom domain. For this you’d need to pay a monthly or yearly fee.
See for details this ultra-brief guide I wrote some time ago but still remains valid.
Online book
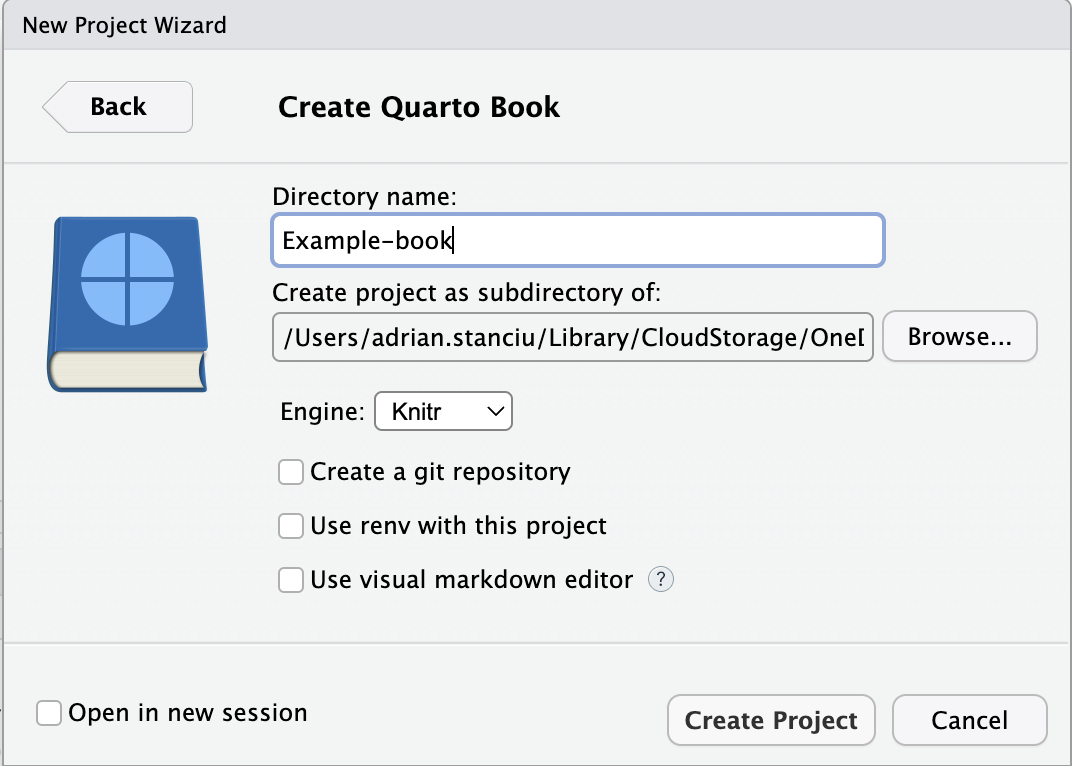
To start with Quarto Books, we should first create such a project. The steps are similar to creating a Quarto Website.5
When you create the project (see Figure 4.7), there will be several files created by default: .qmd, .yml, .bib as well as a folder “_book”. The files and folder already contain the fundamental structure of a renderable book.
To open this default book on your local computer, navigate inside the folder “_book” and open on your Internet browser the index.html.
4.0.6 .qmd
See sub-section on .qmd for creating websites.
If you feel comfortable, create some content for the book, for example, add a chapter about yourself.
4.0.7 .yml
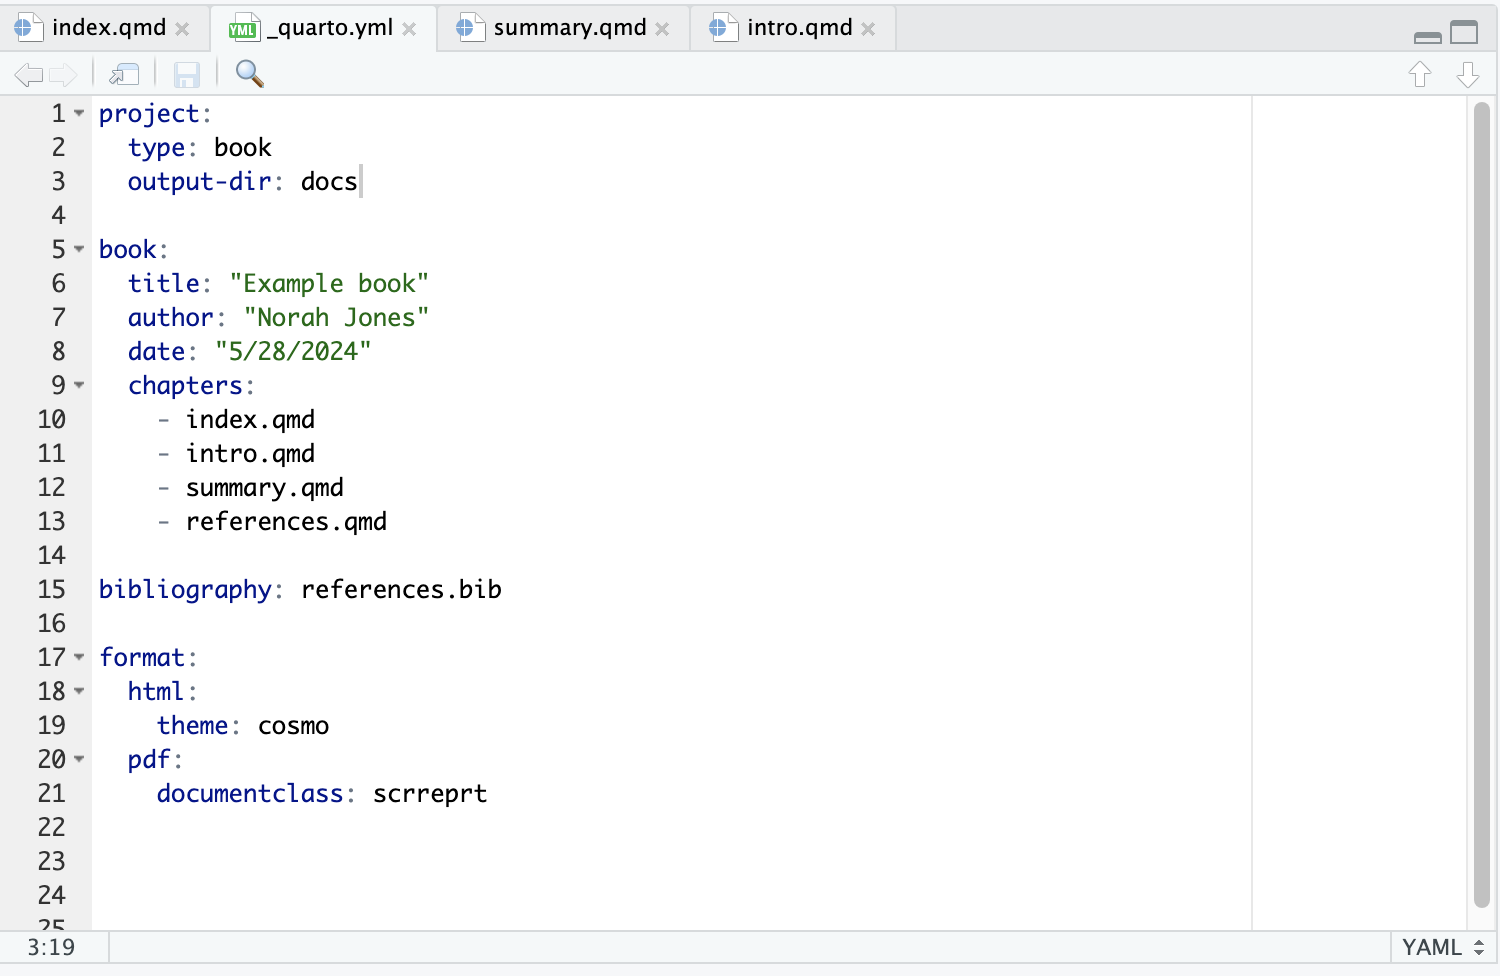
This file type is identical to the one for creating websites. But, there are different attributes addressed! See Figure 4.8.
First to notice, is that now the project we create is type: book. We have learned from the website deployment section that, if we wanted, we could deploy the book via GitHub Pages. That is why I already added the output-dir: docs in Figure 4.8.
Lines 5 through 13 hold attributes of the book. Remember that for the website, we had specified attributes for website. So, at line 4 in Figure 4.4 we had website: followed by attributes whereas at line 5 in Figure 4.8 we have book: followed by several attributes.
In our example, we have four book attributes including a title, author, publication date and chapters. For a comprehensive list of book attributes see here.
Remember to list under chapters: all the .qmd chapters you’d want to render to the final book. Otherwise these are not included. Note also that the order of chapters is defined here.
At line 15, we see the bibliography: entry. We will cover this shortly. But, this element is relevant for books and publishable manuscripts alike. It renders to the final document a .bib file that contains references.
At lines 17 through 21, we see the format: element, which is similar to website creation. Next to the familiar .html format, we now see also .pdf format. This means that we can render the book both in html and pdf formats! Other formats are likewise possible, for instance, .epub which are for e-readers.
You may inspect the PDF version of your book by navigating inside the “_book” (or “docs”, depending on the output-directory indicated in the .yml file) folder provided, of course, that you first rendered the book using, for example, the code line quarto render.
4.0.8 .bib
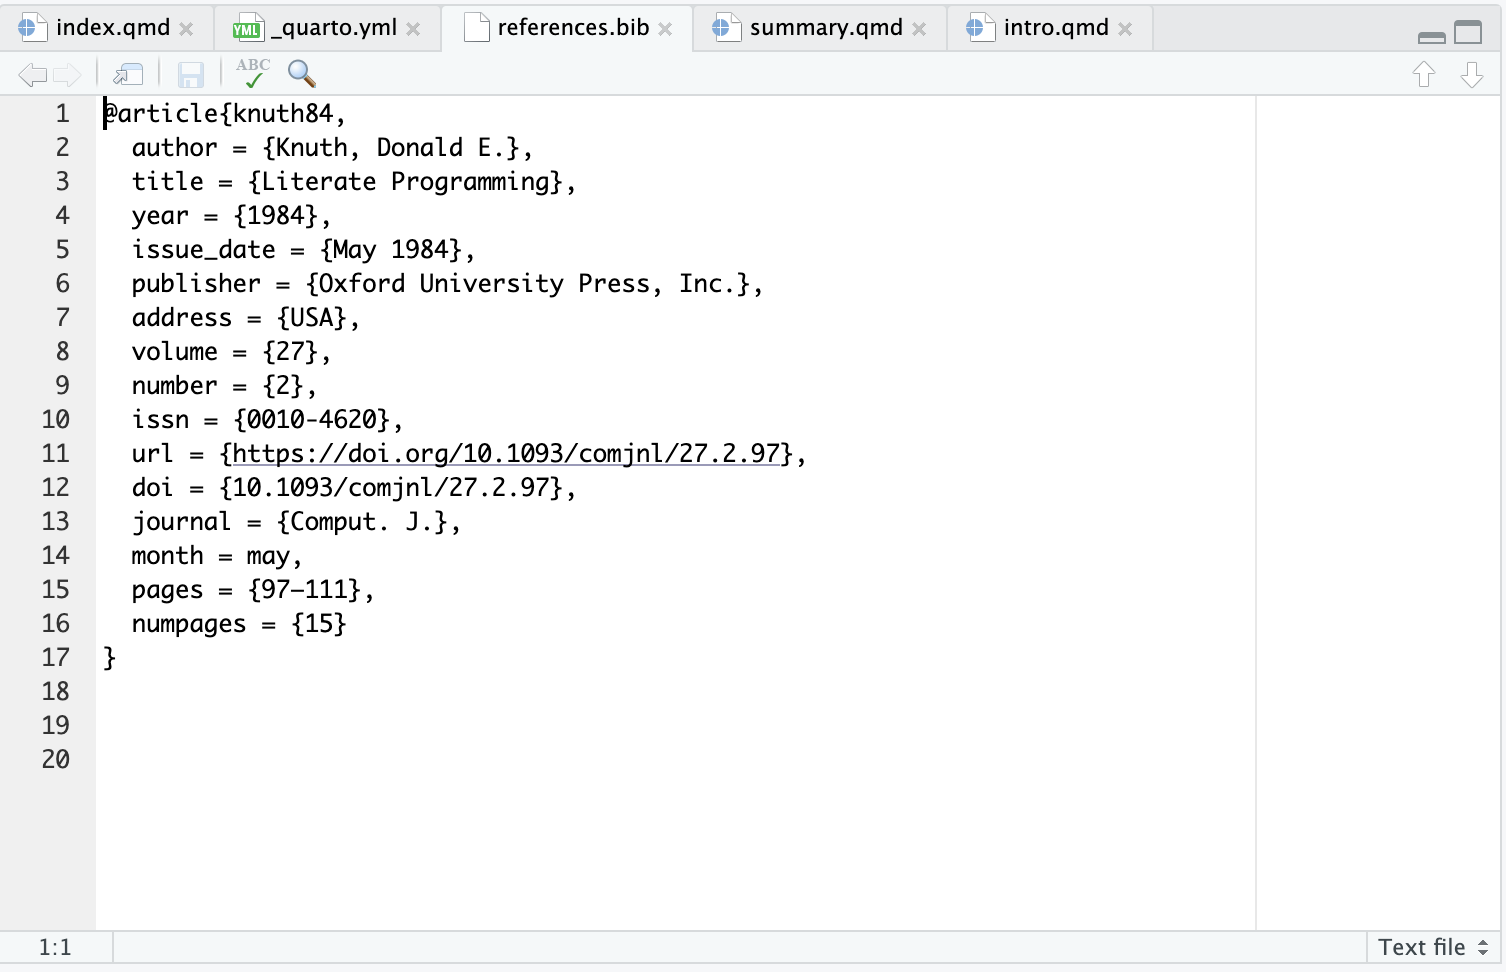
The .bib file format is otherwise said what makes it possible to integrate citations to your book or publishable documents as part of the workflow. .bib files are a type of plain text files (no hyperlinks or enhanced fields that are typical in standard text editors like Microsoft Word).
Read more on using .bib reference files here.
Many journals offer the possibility to download a .bib citation of their articles. For example, navigate to this article Conner and Armitage (1998) published at Journal of Applied Social Psychology (open access). Identify the TOOLS button, press it, and navigate to Export Citation where you can download a BibTex (.bib) citation ready to be incorporated in your reference file.
One can use online tools for transforming plain text citations into .bib citation format. For example, this converter. Use this if you have a plain text list of references and you’d want them transferred into a .bib file.
So, in our case, as shown in Figure 4.8 at line 15, we specify bibliography: references.bib meaning that the bibliography for the book should be constructed through rendering from the file references.bib.
4.0.9 Deployment
4.0.9.1 Via quartopub
Book deployment is almost identical with the deployment of websites.
The easiest option is to deploy through quarto pub. To do this, we only need to do the following:
1 - Make sure we have opened an account on quarto.com
2 - render the book using the line code below (identical to the one used for websites)
quarto renderIt may take a couple of seconds until the book is rendered. And, if it is the first time you render a qurto book it may take a bit until the necessary dependencies are installed.
3 - Publish the book using one line of code.
quarto publish quarto-pubThe example book was published online through quarto.pub here.
4.0.9.2 Via GitHub Pages
The example book was published online via GitHub pages here. Similar to the website example, the book is attributed to my personal website.
Advanced resources
There are some alternatives out there, for example:
To create a blog using the
blogdownpackage. See a step-by-step guide by Shilaan Alzahawi.To create a website using the
distillpackage. See a guide by Sally A.M. Hogenboom.A more comprenesive guide to creating a website using
randRStudiois provided in this eBook by Danny Morris.A different (using older generation RMarkdown) way to self-publish books online using
rpackagebookdown. See this guide by Yihui Xie who basically (co-)created all of this that we are covering throughout the seminar.
Last, but not least. With quarto, one can publish even articles. That is right, one can write using r publishable manuscripts. Start here and see here the journals that already support manuscript submission of quarto templates. This is the cherry on top of the cake in view open and transparent science.
.htmlfiles are specific types of file that are used online↩︎Some div blocks require four : instead of three, for example ::::{}. Additional : indicate therefore upper levels of div code embededdness.↩︎
In Chapter 1 we covered the set up of GitHub and repositories including installing a suite of code. Make sure that is done before attempting to create the folder a
gitrepository.↩︎Note that I am using a custom domain at the root of which is my personal website. In your case it would have a slightly different domain but the website itself will look similar to the example shown.↩︎
As a matter of fact, you might have noticed by now that creating an R project is this simple. You can follow these steps also when creating for example a presentation or a publishable manuscript.↩︎

